How content-aware fill erases a watermark, and why it sometimes smears
By Abdessamad BettalPublished 5 min read
The short answer
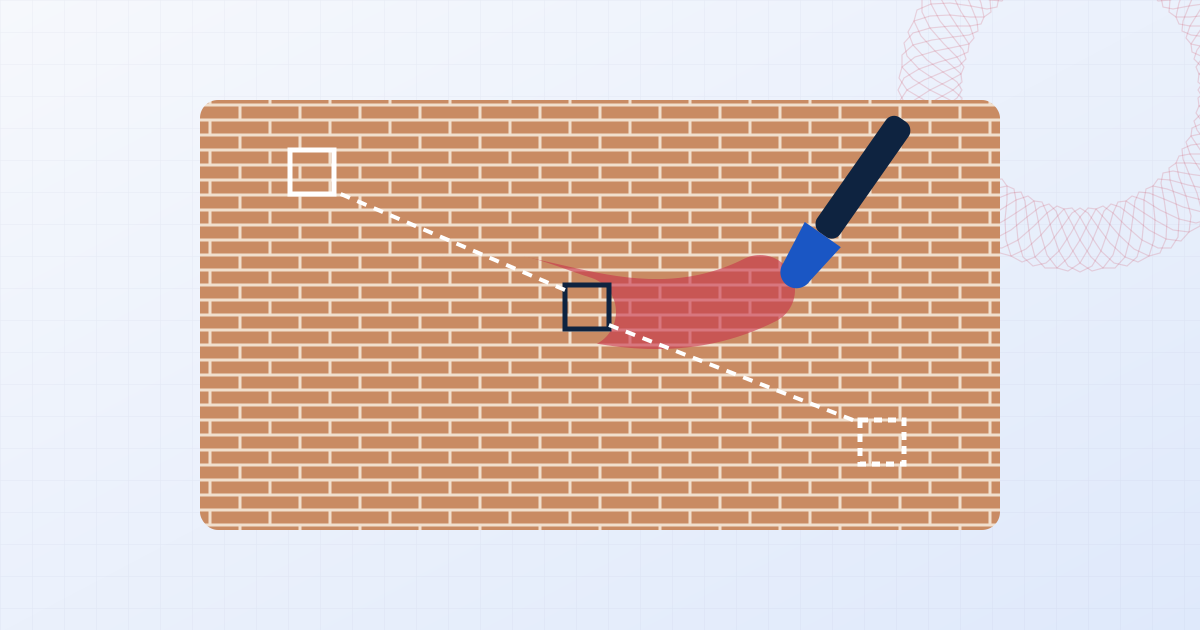
Content-aware fill rebuilds a masked area by copying small patches from the rest of the photo that match the surroundings, refined from a blurry low-resolution guess up to full size. It's excellent on repeating texture such as sky, grass, brick and fabric, and poor where the hidden content appears nowhere else in the image, like a face or a word under a logo.
On this page
Brush over a logo, press a button, and the logo is gone, with sky or grass or brick where it used to be. It can look like magic, but the method is simple to describe, and once you know it you can predict when it will work and when it won't.
The eraser on this site uses a method from the same family as the content-aware fill in professional editors. Here's how it works.
The core idea: borrow from the rest of the photo
The pixels under a watermark are gone. There's nothing to "reveal". What the algorithm can do is predict plausible pixels, and its prediction is: the missing area probably looks like other areas of this photo that look like its surroundings.
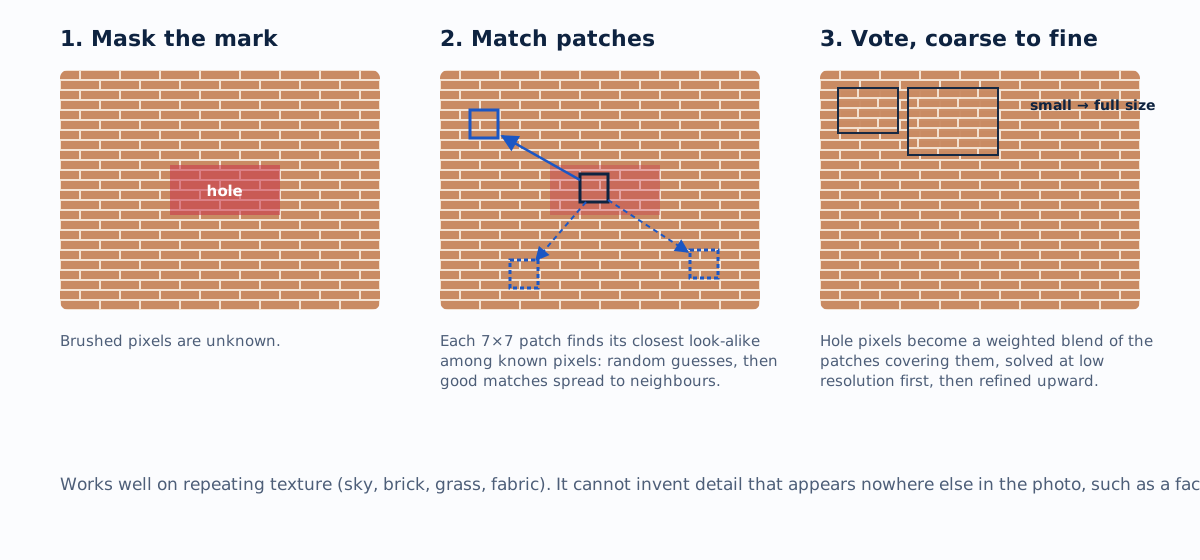
It works with patches, small squares of pixels. The eraser here uses 7 × 7 patches. For every patch that overlaps the hole, the algorithm looks for the most similar patch made entirely of known pixels somewhere else in the image. Then each missing pixel is filled with a weighted blend of what those matching patches say it should be.
Repeat that a few times and the hole fills with texture that agrees with its neighbours in every direction.
PatchMatch: making the search fast
The naive version is far too slow. A 12-megapixel photo has millions of candidate patches, and checking each one for every patch in the hole would take minutes.
In 2009, Connelly Barnes, Eli Shechtman, Adam Finkelstein and Dan Goldman published PatchMatch, a randomised search that finds good matches in a tiny fraction of the time. Adobe's Content-Aware Fill, introduced in Photoshop CS5 the following year, was built on that research. It rests on two observations:
- Random guesses are occasionally good. Start every patch with a random match. Most are poor; a few, by luck, land in roughly the right place.
- Good matches are contagious. If a patch's match is good, its neighbour's best match is probably right next door. So each patch checks whether its neighbours' matches, shifted by one pixel, beat its own, and good matches spread across the hole in a few sweeps.
Add a random search around the current best match at shrinking distances, and the whole field converges after a handful of iterations.
Coarse to fine
Large holes have a problem: a 7-pixel patch in the middle of a 200-pixel hole has no known pixels to compare against. The fix is to work at several scales.
The image is shrunk until the hole is only a few pixels wide, and the fill is solved there, where it captures the large-scale structure: sky above, ground below. Then the result is enlarged one level, used as the starting guess, and refined with patches at that resolution. Repeat until full size. Each level adds finer detail on top of a layout that's already right.
The eraser on this site runs that whole pipeline in a Web Worker, a background thread in your browser, so the page stays responsive, and it works on a region around your selection rather than the whole photo, which keeps it fast on large images.
Why it's perfect on sky and bad on faces
The method can only copy what exists elsewhere in the photo. That predicts its behaviour almost exactly:
| Under the mark | Result | Why |
|---|---|---|
| Clear or cloudy sky | Excellent | Plenty of near-identical patches everywhere |
| Grass, sand, water, gravel | Excellent | Random-looking texture; small errors are invisible |
| Brick, tiles, fabric weave | Very good | Repeating pattern gives perfect matches, though large holes can misalign a row |
| A horizon or a straight edge | Good if brushed in sections | Patches along the edge match other parts of the same edge |
| Text, a sign, a number plate | Poor | The hidden letters appear nowhere else |
| A face, eyes, hands | Poor | Unique structure; the fill produces plausible skin, not a face |
| A busy, detailed scene | Mixed | Plausible clutter, but rarely what was really there |
This is also why a tiled watermark is so much harder to remove than a corner logo. A corner mark usually sits over a background with plenty of matching texture nearby. A tiled mark runs across the subject, where the content is unique, and leaves too little clean area to borrow from.
How to brush for better results
- Cover the whole mark, plus a little. Include the soft shadow, glow or outline around text. Anything you leave behind gets copied into the fill.
- Work in small sections. Erase a word at a time rather than a whole line. Each section is then filled from its own surroundings.
- Split along edges. If the mark crosses a horizon, erase the sky part and the ground part separately.
- Stop when it looks right at viewing size. Zoomed to 400 percent every fill has flaws. Check at the size the photo will actually be seen.
- Use undo freely. Each erase is a separate step; if one comes out smeared, undo it and try a different brush shape.
Video is a different problem
On video, the same mark sits in the same place for thousands of frames, and running a full content-aware fill on each would be slow and would flicker, because each frame's fill would differ slightly. The video logo remover uses a simpler, stable method instead: it rebuilds the box around the logo from the pixels just outside its edges, the same idea as FFmpeg's delogo filter. It produces a soft patch rather than detail, which is what you want for a small channel bug in a corner.
What about generative AI fill?
Generative tools fill holes with a trained image model instead of copying from the photo. They can draw a plausible face or a missing hand, which patch-based methods can't. The trade-off is that they invent content: the result can look convincing and still be wrong. For removing your own date stamp or logo from a background, a patch-based fill is faster, runs offline in your browser, and never adds anything that wasn't in the photo.
Whichever you use, use it on images you have the right to edit. Here's what the law says about removing other people's marks.
Frequently asked questions
Is content-aware fill AI?
Classic content-aware fill, including the eraser on this site, is not a trained AI model. It is an algorithm that searches the photo itself for matching patches. Generative fill tools use trained models that can invent new content, which helps with faces and objects but can also add things that were never there.
Why does the erased area look blurry or smeared?
The algorithm blends several candidate patches for each pixel. Where the patches agree, as on uniform texture, the result is sharp. Where they disagree because the true content is unique, the blend looks soft. Smaller, separate brush strokes usually help.
How can I get a cleaner result?
Brush slightly beyond the edge of the mark, including any shadow or glow; erase in several small passes instead of one large stroke; and work along edges such as a horizon in sections, so each section is filled from the right texture.
Why can't the eraser recover what was under the watermark?
The original pixels are gone: a watermark replaced them. The fill predicts plausible pixels from the rest of the image. It can't know what was actually there, which is why a watermark across a unique detail can't be undone faithfully.
Remove a watermark from a photo
Brush over a watermark, logo or text on a photo and erase it with a content-aware fill. Full-resolution download, undo, and no upload. Works in your browser.
Try the photo eraser